Here you’ll find answers to many of the common support requests we receive for the Asia flow chemistry family. If you can’t find the answer you’re looking for, please contact the Support Team.
-
Asia Manager Installation Guide
This document covers the installation of Asia Manager 1.3.5. and above on a clean computer (with no previous Asia Manager installations).
1 Installing Asia Manager on a new computer
Before starting the installation, please ensure that the computer fulfills Syrris PC specifications. You must have full administrator rights in order to install Asia Manager. Please note that other software might interfere with Asia Manager and therefore it is always recommended to perform the installation on a clean new computer.
1.1 Copy the installer main directory
Copy the entire directory ‘AsiaManager_version number’ onto the local computer, for example onto the PC Desktop.
1.2 Install Asia Manager Prerequisites
In the installer folder, go to “Install 1 – Prerequisites” sub folder and double click on the “setup.exe” icon. If a Windows Security Warning pops-up, click on “Run”.
This will start a setup wizard. Click “Next” to proceed through the wizard. When requested to acknowledge Terms and Conditions of the use of Asia Manager, click on “I Agree”.
Once the installation has completed, check that Asia Manager Prerequisites program has been added to the list of programs installed on the computer. If not, do not proceed further and try reinstalling Asia Manager Prerequisites.
1.3 Install Asia Manager Database
In the installer folder, go to “Install 2 – Database” sub folder and double click on the “setup.exe” icon. If a Windows Security Warning pops-up, click on “Run”.
This will start a setup wizard. Click “Next” to proceed through the wizard. When requested to acknowledge Terms and Conditions of the use of Asia Manager, click on “I Agree”.
Once the installation has completed, check that Asia Manager Database program has been added to the list of programs installed on the computer. If not, do not proceed further and try reinstalling Asia Manager Database.
1.4 Install Asia Manager
In the installer folder, go to “Install 3 – Application” sub folder and double click on the “AsiaManager.msi” icon. If a Windows Security Warning pops-up, click on “Run”.
This will start a setup wizard. Click “Next” to proceed through the wizard. When requested to acknowledge Terms and Conditions of the use of Asia Manager, click on “I Agree”.
Once the installation has completed, check that Asia Manager Database program has been added to the list of programs installed on the computer. If not try reinstalling Asia Manager Database.
If you require assistance or further explanation, please contact support.
-
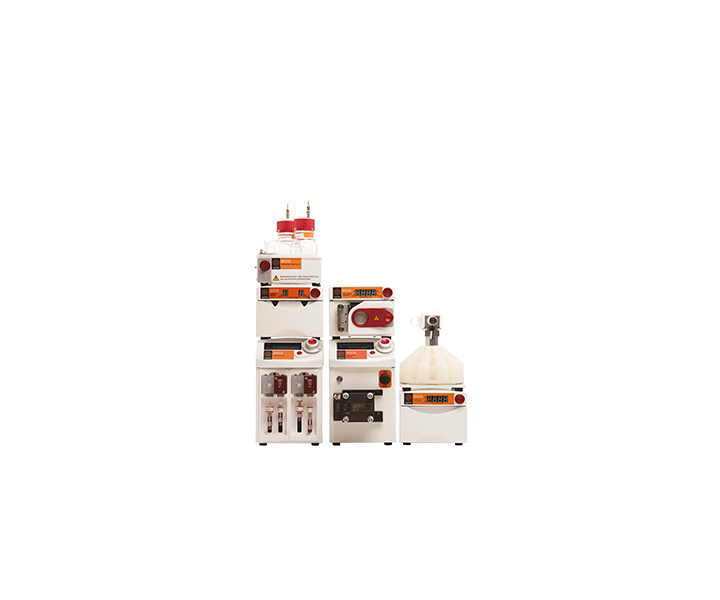
Asia Sampler and Dilutor – Quick Start Guide
This Technical Note provides instructions on how to install the Asia Sampler and Dilutor (SAD) and how to control it in manual mode and from the software. This is not a User Manual and therefore not all options are covered in this document.
1. Setting the Asia Sampler and Dilutor
- Connect the micro mixer chip to the linear connector. The connection can be made on either end
- Clip the micro mixer chip on the side, next to the Analysis Valve
- Connect two tubes to the ports labeled “Input” on the valve. Both tubes need to be fitted with filters and plunged into a bottle containing the solvent that will be used for the dilution
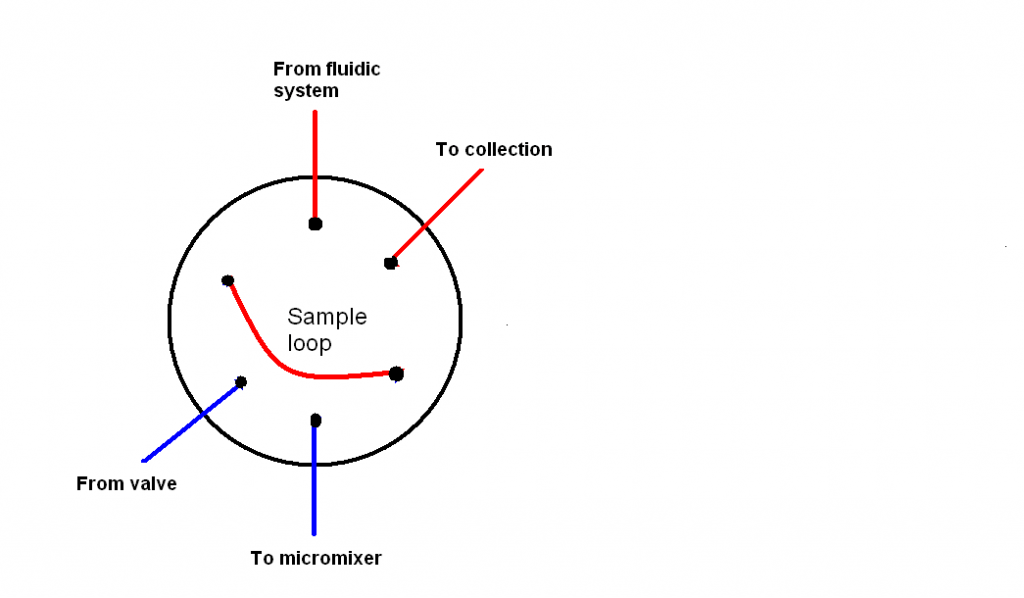
- Connect the Sample Valve to the rest of the flow system (see “From fluidic system” and “To collection” below)
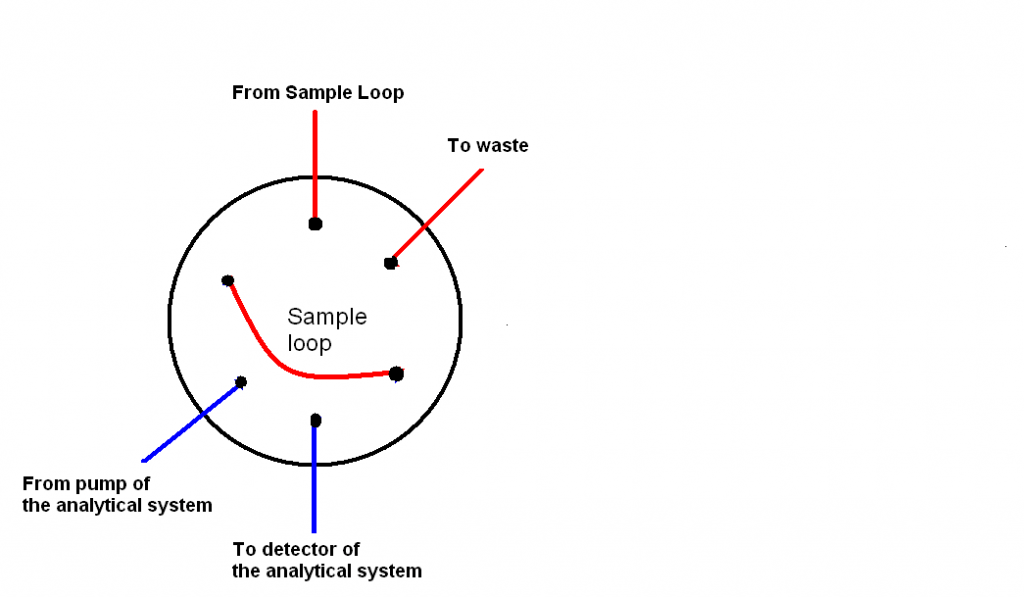
- Connect the Analysis Valve to the analytical device (see “From pump of the analytical system” and “To detector of the analytical system” below).
- Using the provided cable, connect the back of the Asia SAD to the analytical device (HPLC, UPLC, LCMS, etc…).
- Ensure the solvent is HPLC grade and degassed. Prime all the system. Check that there are no bubbles in the syringes and in the tubing.
2. Controlling the Asia Sampler and Dilutor from the front panel
To perform a dilution:
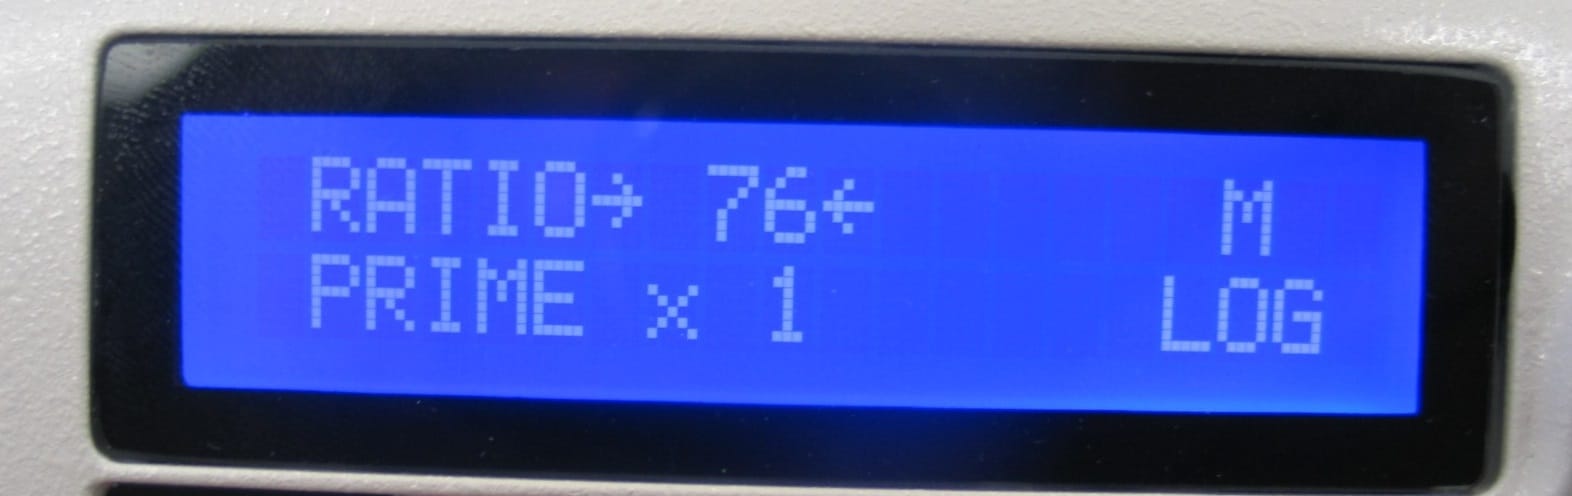
- On the main screen, select RATIO and press the control knob
- Enter the dilution ratio
- Press the control knob to validate the dilution ratio entry. The dilution sequence will start immediately: the SAD will take a sample, dilute it to the entered ratio, store the diluted sample in the Analysis Loop and send a contact-closure signal to the analysis equipment. The full sequence is about 2 minute-long
Overview of the menu options:
- RATIO: determines the factor by which the reaction sample will be diluted. Example: a RATIO of 76 means that the sample concentration is divided by 76. Entering a RATIO value starts the dilution sequence immediately.
- PRIME: allows to flush the system with solvent. A prime sequence will fill the syringes with solvent then empty them. The sequence will be repeated the number of times entered in the menu. Use this function to wash the system and to fill all the tubing with solvent.
- M: gives access to additional control options.
- LOG: lists all actions performed by the Asia SAD in chronological order.
3. Controlling the Asia Sampler and Dilutor from Asia Manager software
Important: To control the Asia SAD via a PC you need Asia Manager software version 1.0.81 or above.
To use the Asia SAD in an experiment:
- Ensure the “Sampler Dilutor” is correctly detected in My Modules / Summary
- In your task / Fluidic Setup, drag and drop the “Sampler Dilutor” component into your fluidic setup. It is usually placed just before the collection point. Design the rest of your fluidic setup as normal
- In your task / Fluidic Setup, click on the Sampler Dilutor and choose if you want to take samples in the middle of the reaction slug or if you want to take samples at fixed period of time
- In your task / Experiments, enter all experiment parameters including the dilution ratio for every single experiment
- Go to Run View and run your list of experiments as normal
Overview of the Manual Controls options:
There are two action tabs In Manual Controls for the Sampler Diluter: “Auto” and “Advanced”.
“Auto” tab options:
- Prime: flushes the system with solvent. A prime cycle consists in filling the syringes with solvent then emptying them. After entering the number of cycles required click “Start” to start priming. Use this function to wash the system and to fill all the tubing with solvent.
- Dilute with a ratio of: determines the factor by which the reaction sample will be diluted. Example: a ratio of 76 means that the sample concentration is divided by 76. After entering the ratio value, click “Start” to start the dilution.
“Advanced” tab options:
- Initialize: clicking on this button triggers an initializing sequence where the valve is set to its start position and both syringe drives are set to their top position (empty syringes).
- Send Trigger Pulse: when clicking this button, the Asia SAD sends a contact closure signal to the 3rd party analytical system connected to the SAD.
- Fill: by clicking on this button, both syringes will be filled
- Empty: by clicking on this button, both syringes will be emptied.
- Sample valve position – Load: sets the Sample Valve (top one) to load position i.e. position where the loop is connected to the rest of the fluidic system.
- Sample valve position – Inject: sets the Sample Valve (top one) to inject position i.e. position where the loop is connected to the valve and the micromixer.
- Analysis valve position – Load: sets the Analysis Valve (bottom one) to load position i.e. position where the loop is connected to the Sample Valve and to waste.
- Analysis valve position – Inject: sets the Analysis Valve (bottom one) to inject position i.e. position where the loop is connected to the pump and the detector of the Analytical system.
4. Controlling the Asia Sampler using 3rd party control
Important: To control the Asia SAD via 3rd party equipment you will need to use the Asia SAD I/O cable 2400368
- Connect the bare ends of the cable to your equipment and plug the 8 way DIN plug of the cable into the back of the Asia SAD
- The table below explains what functions the different wire colors operate
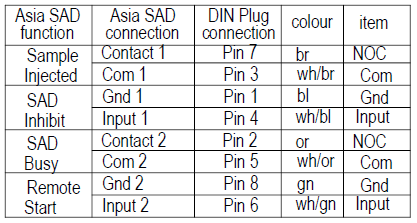
If you require assistance or further explanation, please contact support.
-
Asia Updater Installation Guide
This document covers the installation of Asia Updater Manager software and how to link it to the depository of Asia modules firmware.
1. Installing Asia Updater
Important Note: Before installing Asia Updater, you must have the latest version of Asia Manager software installed on the computer. If Asia Manager is not installed, please refer to the relevant section of the “Asia Systems and Software Manual”.
Step 1: Copy the installer directory
Copy the entire Asia Updater directory on the computer’s Desktop.
Step 2: Install Asia Updater
Launch AsiaUpdater_v1.2. This will install Asia Updater. Please note that there is no shortcut created on the desktop.
Step 3: Create the AsiaNodeUpdatePack depository
Create a folder named “AsiaNodeUpdatePack” in a known location on the computer hard drive (for example, in Program Files/Syrris/Asia Updater).
Remember this location: this is where the firmware updates are stored and where any new updates send by Syrris needs to be copied in order to be installed on an Asia Module.
Step 4: Direct Asia Updater to the AsiaNodeUpdatePack depository
Asia Updater needs to be pointed towards the location of the AsiaNodeUpdatePack. To do so:
Go to Program Files/Syrris/Asia Updater and copy the AsiaUpdater.exe.conf file on the computer desktop.
Open the AsiaUpdater.exe.conf file using Notepad
Enter the location of the AsiaNodeUpdatePack folder on the fifth line of code after “<add key=”engineeringUpdateLocation” value=” (see picture below, the entered text that points to the location of the AsiaNodeUpdatePack is highlighted in blue).
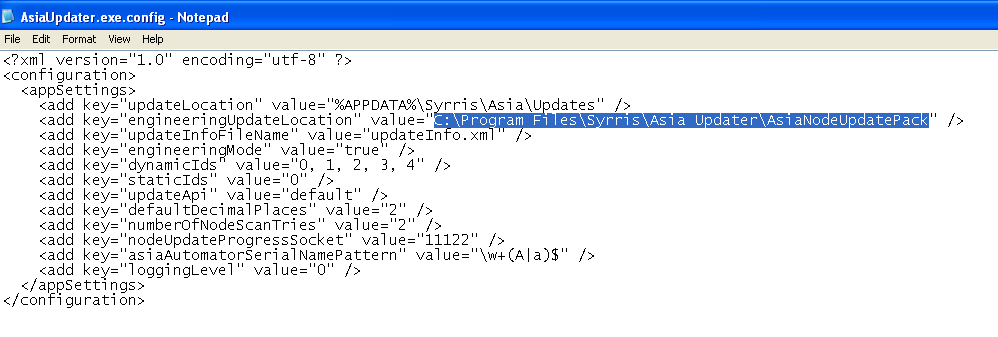
Save the modified AsiaUpdater.exe.conf file then copy and paste it back in Program Files/Syrris/Asia Updater. Click “Yes” if you are asked “Do you want to replace the existing file?”
Step 5: Create a desktop shortcut for Asia Updater
Create a desktop shortcut pointing to the AsiaUpdater.exe file.
Asia Updater is ready to use.
If you require assistance or further explanation, please contact support.
Installation
-
How do I install Asia Sampler and Dilutor?
This Technical Note provides instructions on how to install the Asia Sampler and Dilutor (SAD) and how to control it in manual mode and from the software.
-
How do I install Asia pump firmware?
This document provides instructions for installing Asia Pump firmware onto a blank ICB. Please follow these instructions when an ICB3/4 reflash is unsuccessful.
-
How do I install Asia Updator?
This document covers the installation of Asia Updater Manager software and how to link it to the depository of Asia modules firmware.
-
How do I install Asia Manager?
This document covers the installation of Asia Manager 1.3.5. and above on a clean computer (with no previous Asia Manager installations).
Maintenance
-
How do I replace valves and syringes?
This Technical Note provides instructions on how to remove/replace values and syringes.
-
How do I unblock a microreactor?
This Technical Note provides instructions on how to unblock a Microreactor
-
What type of chemistry can I perform under photochemical conditions?
Our application pages provide all the information you need about continuous flow photochemistry and the unique benefits it offers.
-
Can I use my existing Asia system to perform photochemistry?
Yes, the Asia Photochemistry Reactor is designed to work seamlessly with the Asia Flow Chemistry system (or as a stand-alone module).
If you have an existing Asia Heater or Asia Cryo Controller, a simple adaptor is used in addition to the photochemistry reactor to connect the modules and get you started with performing photochemistry.
-
Can I use the Asia Photochemistry Reactor with my own Flow System?
Absolutely; the reactor can be used as a stand-alone module to compliment any flow chemistry system.
-
Can I use the Asia Photochemistry Reactor to perform photochemical reactions in batch?
Unfortunately not. The reactor is designed for continuous photochemistry reactions only. Have you considered adapting your chemistry to flow? This article provides some useful information about the benefits.
-
What are the range of wavelengths you offer?
Syrris offer a range of single wavelength LED modules selected to enable you to perform the widest range of modern photochemistry. We offer LED modules with 365, 385, 405, 420, 450 and 525 nm wavelengths.
Please see the specification table for more information.
-
Can I combine wavelengths in the same reactor?
The unique design allows up to 8 LED modules to be housed in the photochemistry reactor. Combine any of the available LED modules to perform multiple wavelength applications and advance your chemistry.
-
What temperature ranges can I perform my photochemical reactions at?
When combined with either the Asia Heater or Asia Cryo Controller you can run reaction down to -40°C and up to +80°C.
-
Do I require external cooling for your LED light sources?
The construction of the LED modules allows the use of high intensity light with no external cooling to maintain optimum performance even at their maximum power. This translates to longer lifetimes of your LED modules and efficient temperature control of your reactions.
-
What type of scales can I expect to work on?
The photochemistry reactor enables throughputs of mg’s to 10’s g/h. On a lab scale this is more than sufficient for most applications. The reactors’ design allows you to increase the radiant flux to your reaction with up to 8 x LED modules of the same wavelength. This potentially will reduce reaction time and increase scale and throughput.
-
What residence times can I access?
With the widest dynamic flow rate range on offer (1 µl/min – 10 mL/min) and reactor volumes of 4 mL and 16 mL, the Asia Photochemistry Reactor can access residence times of from seconds to hours when used with the Asia Syringe Pump and Asia Flow Reactors.
-
How easy is it to optimize my reaction conditions?
The Asia Photochemistry Reactor allows the ability to optimize reactions conditions with a single LED module and easily add additional modules to increase the power (photon flux) to your reaction. Start with a single LED module for optimization and add up to eight modules for reaction scale-up.
-
What is the chemical compatibility of the Asia Photochemical Reactor?
The Asia Photochemistry Reactor is compatible with any solvent or reactant. The Asia Flow Chemistry product range is extremely chemically resistant, with the ability to pump strong acids and bases with no issues.
-
Is the Photochemistry Reactor safe to use?
The Asia Photochemistry Reactor is designed with in-built safety. The reactor includes all safety features expected of modern chemistry laboratories, with interlocked fittings and light proof design, meaning the user is not exposed to high intensity light. The Asia Photochemistry Reactor can be used safely within standard fumehoods with piece of mind.
-
Can I perform photochemistry with reactive gases?
Performing photochemistry with reactive gases isespecially important when running photooxygenation reactions. The Asia Photochemistry Reactor is proven to work with reactive gases; our application pages demonstrate examples of photochemistry performed with reactive gases.
-
Can you supply a wavelength not listed?
If you require a wavelength that is not listed, speak to us and we can discuss customizing one of our LED modules to your specifications.